
Ultra High Quality 3D Model Ready to Export in Agisoft Metashape Detailed Video | Aerial Surveying
FULL HIGH QUALITY 3D MODEL IN AGISOFT FOR EXPORT TO A CLIENT
Agisoft recommends creating Tiled Models for City Scale Modelling Projects. These Models are Great for use by Architects as they Compile Data into small Tiles for Better Detail.
The Above Video Shows a Detailed Process in Agisoft and describes how each Parameter Along the Process Effects the Output Model.
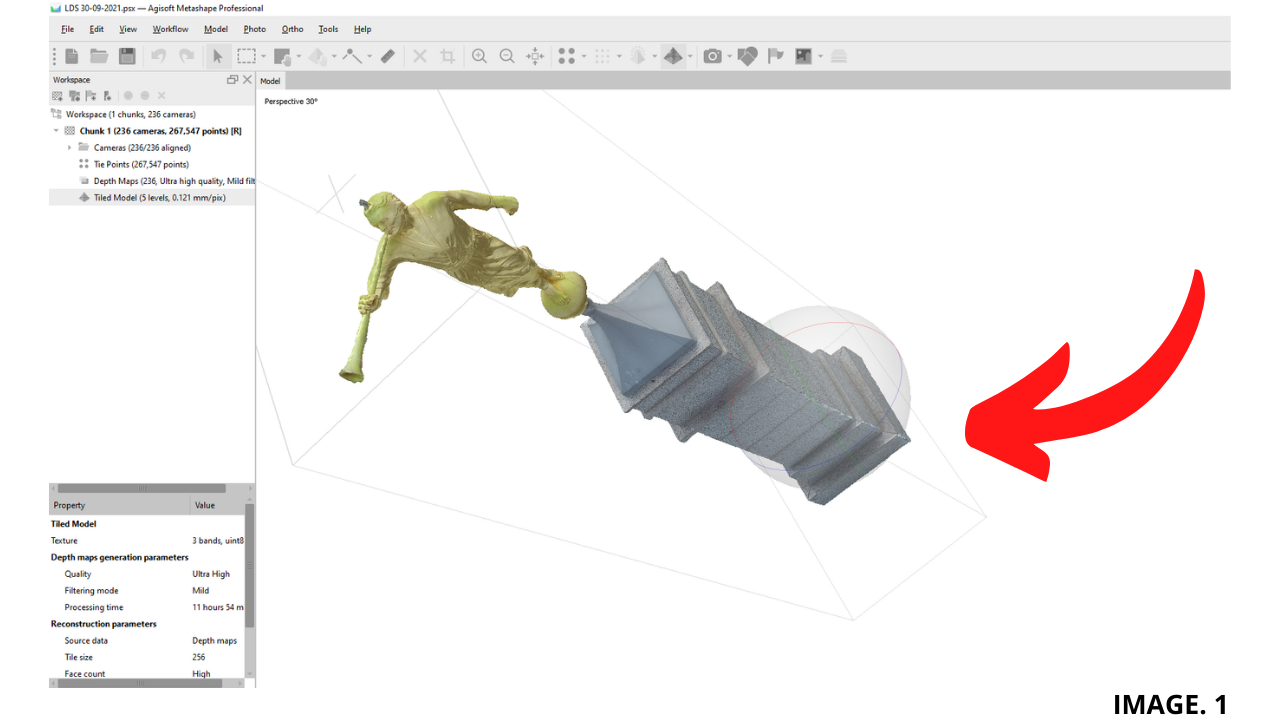
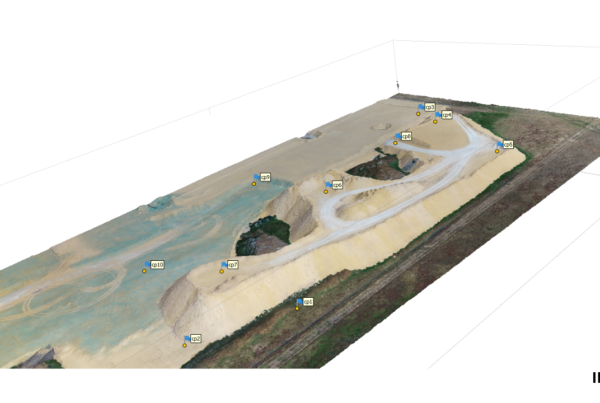
Image. 1 shows the Tiled Model at the End of this Process:
ALIGN PHOTOS:
The Process of creating a High Quality 3D Model for Export begins with Photo Alignment.
TIP: ‘See Another Detailed Example of Agisoft Parameters here’
Prior to Photo Alignment, Photos must first be added, by Selecting: Workflow >> Add Photos
In the Photo Alignment Window we can first select the Accuracy:
Accuracy: Accuracy can be selected from 5 Options:
- Highest (x4)
- High (Default)
- Medium (- x4)
- Low (- x16)
- Lowest (- x64)
As a Default, Agisoft uses HIGH Accuracy as the same Photo Resolution as the Photos collected in the Field. Where, HIGHEST Accuracy will upscale the Images by a Factor of 4. And anything lower, downscales the Resolution by a Factor of 4 each time.
For Example; Medium reduces Resolution Size by 4, Low reduces by 16 and Lowest reduces by 64.
The next Options to check are Generic Preselection and Reference Preselection:
Image. 2 shows the Align Photo Options:
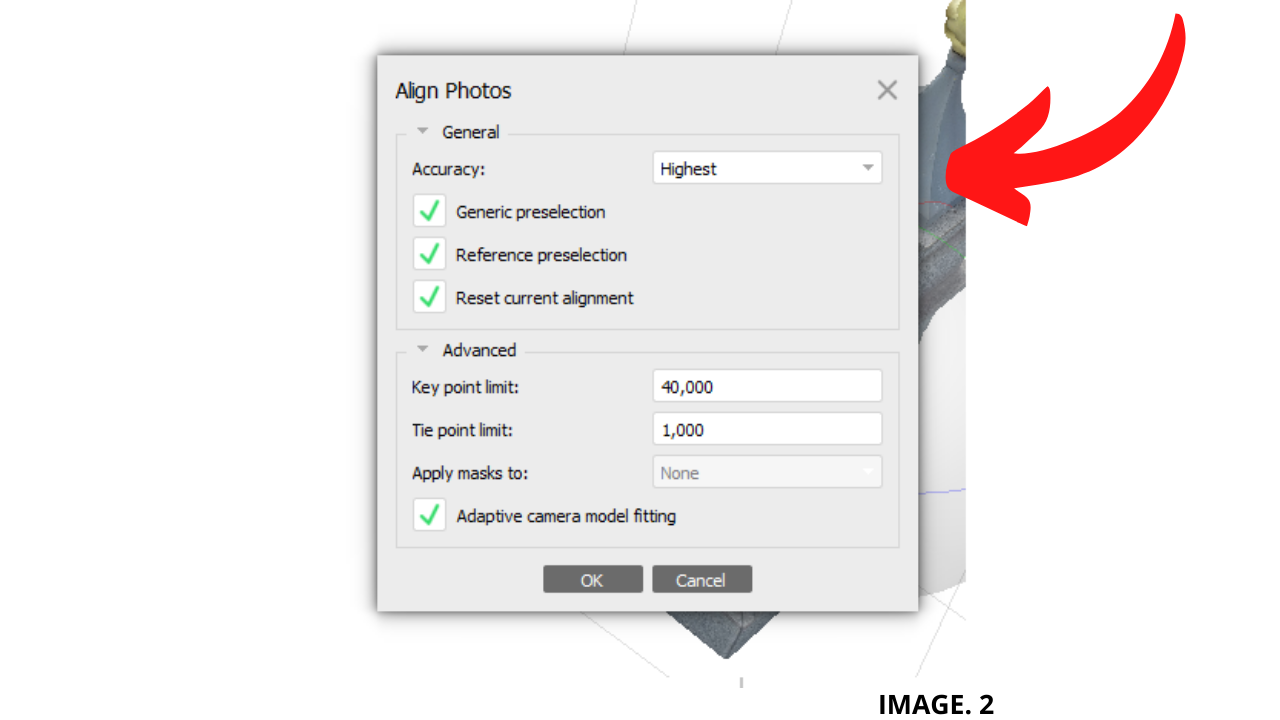
Generic Preselection: Generic Preselection is an option that can be used to pre-scan the photos to check for images that overlap, from those that do not.
And so, if Generic Pre-scan does not detect common photos, then Metashape will not spend time on comparing them.
In sets of Large Data, this can generally save lots of time, but with Smaller Datasets it could generally take more time and RAM.
Reference Preselection: Reference Preselection is similar to Generic Preselection, but uses the Geotagging GPS Locations of your photos which will definitely speedup the Alignment Process, especially for larger datasets.
If your Photos are not Georeferenced then this Option cannot be used.
Key Point Limit: Key Point Limit is the number of Points Metashape will Extract from each photograph. By Default the Software Recommends, Key Point Limit of 40,000.
If Zero is entered there is no limit.
TIP: ‘See How Tie Points Work in Other Examples here’
Tie Point Alignment: The next part of the Photo Splicing is carried out by the Tie Point Limit; this is the amount of Matching Points that the Software identifies in each Photograph.
As a Default Agisoft is set to 1,000. This means that out of 40,000 Key Points per photograph, the Best Matching 1,000 Points are selected as Tie Points. Again if Zero is entered here, then the Limit will be Unlimited.
Adaptive Camera Model Fitting: When the Adaptive Camera Model Fitting is left Unchecked, Metashape will refine only the Minimal ‘Fixed’ Camera Parameters, such as focal length, principal point position, three radial distortion coefficients (K1, K2, K3) and two tangential distortion coefficients.
TIP: ‘Look into more Detail about Camera Calibration Parameters’
This Unchecked Option is OK for a Standard Aerial Survey with less Geometry,
However, with a Survey with more Geometry, then Checking Adaptive Camera Option will produce better results, as it adjust Extra Parameters.
REDUCED ERROR AND OPTIMISE CAMERAS:
Optimising your Camera Alignment. Therefore, you then select the Star shaped ‘Optimise Camera Button’, or Tools >> Optimise Cameras, select Cameras Parameters, then OK.
Optimization of cameras should be performed before building dense cloud or mesh, otherwise the dense cloud will be discarded.
You should select camera parameters based on the camera type used. This is listed in more detail in the Agisoft Manual. Most DJI Drones have a Frame Type Camera, its parameters are listed in Agisofts’ Online Manual.
Alternatively you can select Adaptive camera model fitting, which enables automatic selection of camera parameters to be included into adjustment based on their reliability estimates.
Image. 3 shows the Optimise Camera Option:
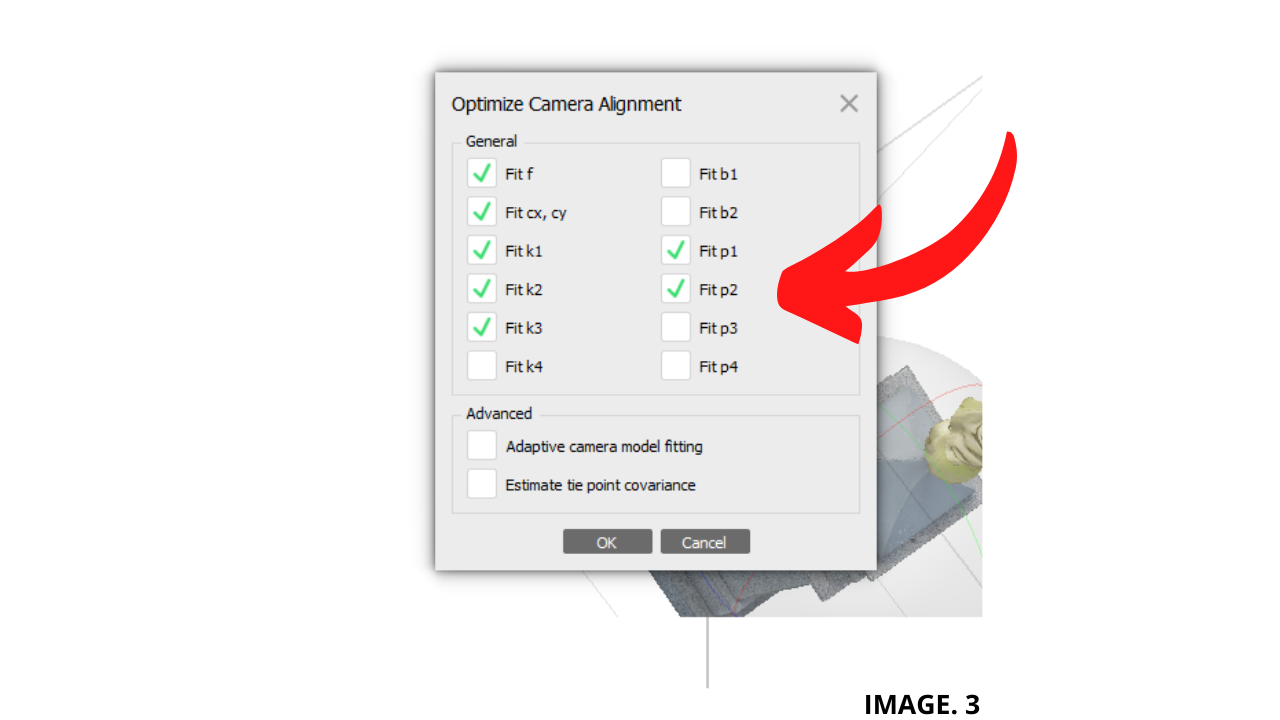
Some of the Main Parameters are Described as Follows:
fx, fy: Focal length in x- and y-dimensions measured in pixels.
cx, cy: Principal point coordinates, i.e. coordinates of lens optical axis interception with sensor plane.
k1, k2, k3, k4: Radial distortion coefficients.
p1, p2, p3, p4: Tangential distortion coefficients.
POSITION & RESIZE THE BOUNDING BOX:
Once Cameras are optimised, you can then Position the Bounding Box and Resize to further Isolate your Model for Processing.
TIP: ‘See A Detailed Example Here of Bounding Box Adjustments’
You may have to play around here with various views, in order to contain the Points you wish Metashape to Process.
You can Change the Script html of the Bounding Box resize it automatically, this can be Achieved by clicking, Tools >> Run Script. Many Script code can be Found in the Agisoft Forum.
This Step is Important because it can dramatically Speed up your Processing time.
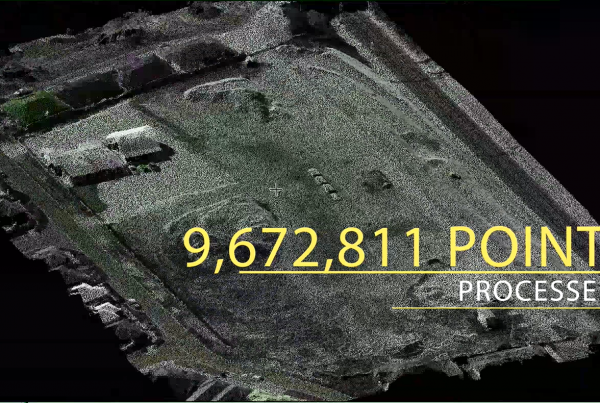
DENSE CLOUD:
Now that Photos are Aligned and Cameras Optimised, the Workflow Process can continue. The Next Model that needs to be created is the Dense Cloud.
Quality: The Dense Cloud first gives you the Option to Choose a Quality Setting.
As a Default Metashape should be used on Ultra High, for a Ratio of 1:1 Processing. The Quality is then further Reduced by a Factor of 2, or Halved, for every other reduced Setting.
As an Example of the Dense Cloud Quality Settings; If Ultra High produces 1 Million Points, then High Will Produce 500,000 Points.
The other Ratios are given as: High: 1:2, Medium: 1:4, Low: 1:8, Lowest: 1:16.
Image. 4 shows the Dense Cloud Tab Options:
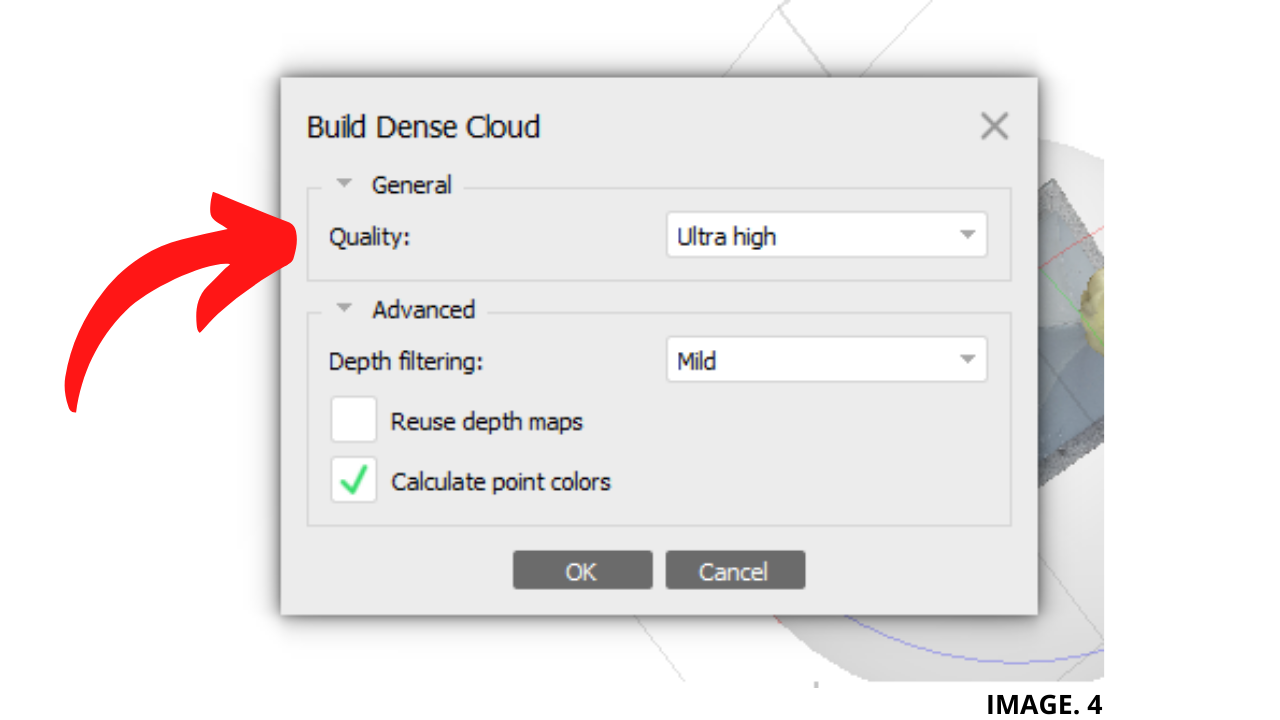
Depth Filtering: The Next Option that can be selected in the Dense Cloud Tab is the Depth Filtering Option.
TIP: ‘Look into More Detail at Depth Filtering Here’
This Option if set to AGGRESIVE (Highest), will Filter or Remove most of the Points which do not appear to be connected to a Main Surface. This should generally be set to the Lowest Setting of MILD, unless you want to filter away things like Leaves/Plants etc.
Reuse Depth Maps: With the Option to reuse Depth Maps. Depth Maps can be reused for the Dense Cloud Generation Operation. However, Agisoft states that if there are less than 100 common valid Tie Points between two images, the Depth Map will not be generated for them and this Option will be sometimes blanked out.
Calculate Point Colors: This option can be unchecked in case the points color is not of interest. This will allow to save up processing time.
TILED MODEL:
The Final Model to build for Export, is the Tiled model. The Tiled Model will give you the final result with the best quality.
This step will take quite a bit of time (a few hours at least) during which your computer will be unusable. Tiled model will produce a detailed textured mesh from the dense point cloud.
Agisoft recommends creating Tiled Models for City Scale Modelling Projects.
Image. 5 shows the Tiled Model Tab Options:

Other Options are Described as Follows:
Source Data: Depth Maps; Recommended for large projects when Build Mesh procedure is not feasible due to processing time and result management issues. Using the Dense Cloud is Sufficient for this Project.
Pixel Size: Options here include the Pixel Size, which is calculated and Given Automatically.
Tile Size: Agisoft Recommends Faster Visualisation for a Smaller Tile Size.
Face Count: Specifies the maximum number of polygons in the final model.
For the purpose of the dense cloud based processing, this is calculated based on the number of points in the dense point cloud: the ratio here HIGH: 1/5, MEDIUM: 1/15, and LOW: 1/45 respectively.
Ghost Filtering: Ghost Filtering Option can be Check and used to Filter out any Objects contained in the Model which are moving, i.e. Vehicles, or thin Structures.
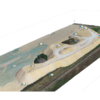
UPLOAD TO CLOUD:
Once Ready to Upload your Tiled Model for your Client, you can then Click on File >> Upload Data.
Image. 6 shows the Options given by Agisoft to Upload your Tiled Model:

Recent Comments